Whenever working in the Site Tools Ribbon Page, you will notice the ![]() Button at the top of many of the report screens. The Student Selector allows you to select a group of students for whom you would like to perform a task.
Button at the top of many of the report screens. The Student Selector allows you to select a group of students for whom you would like to perform a task.
Click the ![]() Button.
Button.
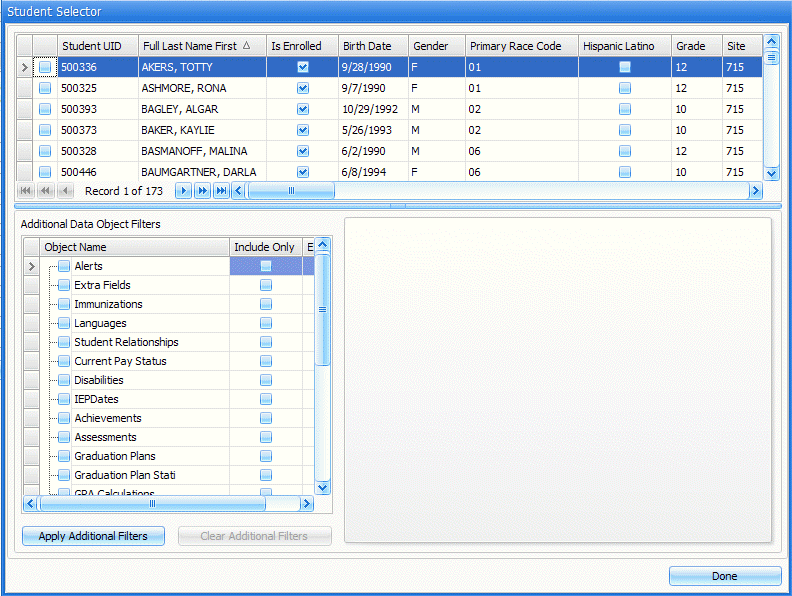
The following screen will appear:

If you want to select all students, simply click the ![]() Button.
Button.
To filter for a specific group of students:
At the top of the student selector, you will see a list of students. From here, you can filter for a specific group according to the column headers or select a custom filter. For example, to filter for all students in the 9th grade, move the mouse to the Grade Column Header, click the ![]() Button and select 09 from the list. You can filter by as many columns as necessary.
Button and select 09 from the list. You can filter by as many columns as necessary.
At the bottom of the screen you will notice the Additional Data Object Filters. This allows you to apply additional filters to the student records you have filtered for in the above grid. From the list, select the check box next to the Object Name you would like to filter for. For example, if you would like to filter for the students in the 9th grade that have attendance records, you would select the check box next to Attendance and the system will select the Include Only Check Box. The Attendance Tab will then display. Click the ![]() Button to see the list of students. You could then filter for a specific Attendance Code in the Attendance Grid. Click the
Button to see the list of students. You could then filter for a specific Attendance Code in the Attendance Grid. Click the ![]() Button.
Button.
After you have filtered down as far as possible using the column headers filter and the Additional Data Object Filters, you can easily select the student(s) you want to use by selecting the check box next to their name in the upper grid. Click the ![]() Button to continue with your task.
Button to continue with your task.
Note: The system saves the filters you have applied on the Student Selector screen whenever you exit from the Student Selector. Therefore, whenever you go to a different task where the Student Selector is used, whatever filters you have applied will still be in effect unless you cancel the filters.
Note about reporting of Race and Ethnicity:
The Race Count Field and Race Ethnicity Reporting Category Fields are used in the reporting of Race and Ethnicity for the Accreditation Report. The following is the logic used to populate the Race Ethnicity Reporting Category:
|
Hispanic/Latino Indicator |
Race Count |
Race Ethnicity Reporting Category |
|
Checked |
|
Hispanic or Latino Ethnicity |
|
Unchecked |
>1 |
Two or More Races |
|
Unchecked |
1 |
Race Code Description (i.e., Black, American Indian, Asian, Pacific Islander, White/Caucasian) |
To cancel the additional filters, click the ![]() Button. To clear the filters for the top of the grid, click the
Button. To clear the filters for the top of the grid, click the ![]() Button in the lower left-hand part of the grid.
Button in the lower left-hand part of the grid.