.
.Click the Options Menu, Design Reports to access the Design Reports Form.
Input Specifications are as follows:
Report: Use the Drop Down List Box to select the type of Report you want to design.
Layout: Type to enter a Layout Name or use the Drop Down List Box to edit a previously entered Layout.
Click .
The Report Designer will appear in a new tab. .
You will notice the Report Menus on the right side of the screen.
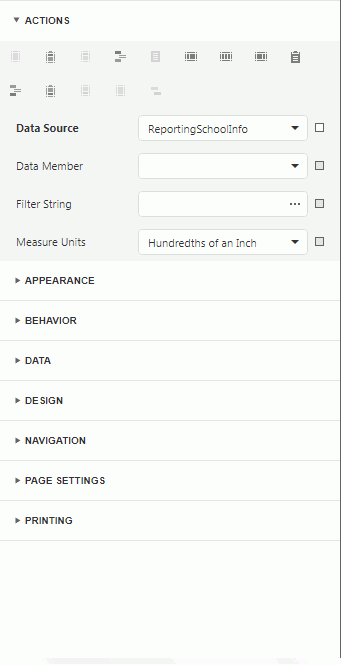
The Actions Menu defaults to open and contains
the Report Bands buttons.  The Report Bands allow you
to specify where and when you want certain data to display on the report.
The Report Bands allow you
to specify where and when you want certain data to display on the report.
Whenever you click on a Report Band button, the system will add that band to the report on the left.
The Report Band Buttons perform the following actions:
 Insert Top Margin Band
 Insert Report Header Band
 Insert Page Header Band
 Insert Group Header Band
 Insert Detail Band
 Insert Detail Report Band
 Insert Group Footer Band
 Insert Report Footer Band
 Insert Page Footer Band
 Insert Bottom Margin Band
 Insert Sub Band
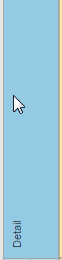
You will notice that the system displays which band you are working with in the upper right hand corner of your screen.
For example, if you are working in a detail band, this will display.

You can use the Drop Down List Box to select the band you want to work with.
OR
After you have inserted a band or if you want to edit a band on the report, click on that band in the report on the left.
For example, if you inserted a Detail Band or want to work with a Detail Band, click on the Detail Band on the left.
The
Actions Menu allows you to make changes to the band.
NOTE: The Actions you can perform to the band depend upon which one you are working with. The Actions display on the right side of the report.
The
following are instructions for a DETAIL BAND. When a Detail Band
is selected, the Sort Fields Menu displays. 
Changes to the Sort Fields allows the data fields in the selected Detail Band of the report to be adjusted as desired.
Click Sort Fields to expand the menu. 
Click  to add a Sort Field.
Use the Drop Down List Box to enter the Field
to Sort By. 
If you want to delete a Sort Field, click on
the Sort Field. 
Then click  .
.
The
following are instructions for a GROUP BAND. When a Group Band
is selected, the Group Fields Menu displays. 
Click Group Fields to expand the menu. 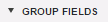
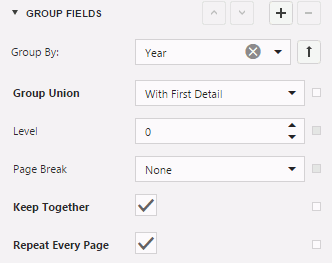
Click to add a Group Field.
Use the Drop Down List Box to select the Field
you want to Group By. 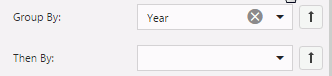
If you want to delete a Group Field, click on the Group Field.
Then click .
The following are instructions for a Text Field. When a Text Field is selected, the Text actions display.
The Text Buttons perform the following functions:
 Align to Grid
 Size to Grid
 Center Horizontally
 Center Vertically
 Bring to Front
 Send to Back
If you want to change the text, click in the
Text Box and enter the text. 
OR
You can double click in the field on the report.

The
following are instructions for a Data Binding Field. A data binding
field pulls data from the application and displays that data on the report.
When a Text Field is selected, you will see the Data Binding Field Below
it. 
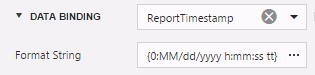
Click Data Binding to expand the menu. 
Use the Drop Down List Box to enter the data you want to bind to the Text Field. For example, if the Text Field is for a Report Time Stamp, you would select ReportTimeStamp.
Then, use the Format String to enter the format for the data.
Commonly Used Format Strings
Format Strings can be used when data binding in Report Designer to achieve the desired display formatting for text, money or dates. Generally, the number after the alpha-character defines the number of decimal places desired. To change the default formatting, enter the format strings in the Format String Field under Data Binding.
For Currency, Use:
{0:C2}
Example: $35,000.00
For Numeric, Use:
{0:N2}
Example: 35,000.00
For General Format With 2 Decimals, Use:
{0:F2}
Example: 35000.00
For General Format With 0 Decimals, Use:
{0:F0}
Example: 35000
For Fixed Number of Digits, Use:
{0:0000000}
Example: 0035000
Date Formatting:
If Format String Left Blank or Reset
Example: Saturday, July 1, 2017
{0:MM/dd/yyyy}
Example: 07/01/2017
{0:MM/dd/yyyy hh:mm:ss tt}
Example: 07/01/2017 12:00 AM
{0:M}
Example: 7
{0:MM}
Example: 07
{0:MMM}
Example: Jul
{0:MMMM}
Example: July
{0:D}
Example: 1
{0:DD}
Example: 01
{0:DDD}
Example: Sat
{0:DDDD}
Example: Saturday
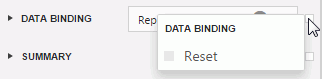
If you need to reset the data binding, left-click the white box next to the Data Binding Drop Down List Box and select Reset.
The Summary Menu allows you to make changes
to the behavior of the Text Field or Data Binding Field. 
Click Summary to expand the menu. 
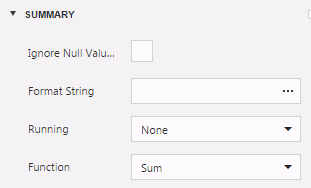
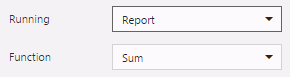
If you want a total sum for the entire report for a specific data bound field, enter Report for Running and Sum for Function. .
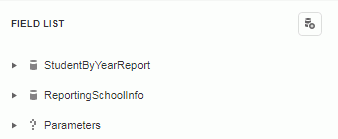
The following are instructions for the Field List.
Click the Field List Icon in the upper right
corner of your screen. 
This allows you to pull in a specific data binding field directly from the field list into any report.